Disable a Linux User Account Without Leaving SSH Open
Knowing how to disable a Linux user account is routine sysadmin work, but there’s a trap in it that catches experienced administrators. The most commonly recommended method, locking the password, does not stop someone logging in with an SSH key. That means the standard “lock the account” reflex can leave a departed employee with working access. This guide covers four tested methods and explains which ones actually close every door. It finishes with a checklist for full revocation. By Chukwuma Irozuru Method 1: Expire the Account (Recommended) Setting an expiry date in the past disables the account completely, including SSH key logins, because account expiry is checked during the account phase of authentication regardless of how the user authenticated. You can also set a future date, which is useful for contractors with a known end date. This is the method to reach for first when you need to disable a Linux user account properly. It’s the only single command here that blocks both password and key-based access. Method 2: Lock the Password Locking prepends a ! to the password hash, making it impossible to match. Both commands below do exactly the same thing. Important: This only blocks password authentication. If the user has an entry in ~/.ssh/authorized_keys, they can still log in. Use this when you want to force a password reset workflow, not when you’re revoking access. The Passwordless Account Gotcha If the account had no password to begin with, unlocking fails: Set a password instead of unlocking, or use usermod -p as the error message suggests. Method 3: Force a Password Change This doesn’t disable anything. It marks the current password as expired, so the user must change it at the next login. Useful for compliance rotations or after a suspected credential leak. Note that passwd -e takes no date argument. If you want a scheduled expiry, use chage as shown in Method 1. Method 4: Set a Nologin Shell Replacing the login shell stops interactive logins while keeping the account functional for services that run as that user. This is the right tool for service accounts. It won’t stop commands forced through SSH or scheduled jobs, so don’t treat it as a security boundary on its own. Watch Out: The -l Flag Means Two Different Things This trips people up and the consequences are messy. Command Flag What it does passwd -l user –lock Locks the password usermod -L user –lock Locks the password (same effect) usermod -l new old –login Renames the account passwd -e user –expire Expires the password now usermod -e DATE user –expiredate Sets account expiry date So -l locks in passwd but renames in usermod. And -e expires a password in passwd but sets an account expiry date in usermod. Read the command, not just the flag. Why Locking Alone Won’t Disable a Linux User Account Three gaps matter when you’re revoking access rather than pausing it. Locking the password leaves SSH key authentication working. It also leaves existing sessions running, so someone already logged in stays logged in indefinitely. And root can still switch to the account with su – user, since that bypasses password checks entirely. Any one of these means the account isn’t really disabled. Treat password locking as a pause button, not a revocation. Talk to our team about Linux hardening and access management → TALK Full Lockout Checklist When someone leaves and you need to disable a Linux user account completely, run all of these. Steps four and five are the ones people forget, and they’re the ones that matter most. Verifying You Actually Disabled the Account Always confirm rather than assume. After you disable a Linux user account, these three checks tell you whether it really took effect. Drop a comment, we will love to hear from you Read More Here
AWS Chaos Engineering: Breaking EKS Safely With FIS

AWS chaos engineering is the practice of breaking your own systems on purpose, under controlled conditions, to find the failure modes you’d otherwise discover at 3am. For EKS microservices, that means two complementary layers: killing pods inside the cluster, and injecting faults into the managed AWS services your pods depend on. This guide covers both. Every action ID here was checked against the current AWS documentation, and every JSON template was validated with a parser before publication. What You’ll Set Up You’ll deploy kube-monkey for scheduled random pod kills inside EKS. Then you’ll build AWS FIS experiment templates for targeted pod deletion, RDS reboots, and ElastiCache availability-zone interruption. Finally, you’ll learn how to run these safely and automate them. Two things are worth knowing before you start any AWS chaos engineering work. First, FIS charges per action-minute, so experiments cost money. Second, always run against staging before production, and always configure stop conditions. Prerequisites You’ll need an AWS account with permissions for EKS, RDS, ElastiCache, and FIS, plus a running EKS cluster on version 1.23 or later. Install kubectl, helm, and the AWS CLI, and configure your credentials. You’ll also need an IAM role for FIS experiments, which we create in step two. Step 1: Deploy kube-monkey for Random Pod Kills Kube-monkey brings Netflix’s Chaos Monkey model to Kubernetes, and it’s the simplest entry point into AWS chaos engineering. It runs once each weekday morning, builds a schedule, then kills pods from opted-in deployments at random times during a configurable window. Install the Chart Start with dry_run = true in your config so terminations are logged rather than executed. Verify the schedule looks sane before letting it kill anything. Opt a Deployment In This is where most guides go wrong. Kube-monkey needs the kube-monkey/identifier label to match pods back to their parent app, and the labels must appear on the pod template. Omit the identifier, and nothing will ever be killed. Apply it with kubectl apply -f orders-deployment.yaml. With mtbf: “1”, this deployment becomes eligible for a pod kill roughly every weekday. The selection is a biased coin flip rather than a guarantee, and kills land inside the configured window, which defaults to 10am–4pm. Step 2: Create the FIS IAM Role FIS assumes a role to act on your resources, so the role needs both a trust policy and permissions. The trust policy is the part most tutorials skip. Then attach permissions covering the actions you actually intend to run. AWS also publishes managed policies such as AWSFaultInjectionSimulatorRDSAccess and AWSFaultInjectionSimulatorEKSAccess, which are simpler than hand-rolling permissions. Step 3: Extra Setup for EKS Pod Actions FIS pod actions need Kubernetes-side permissions as well as IAM. Create a service account with a Role and role binding granting access to pods, pods/ephemeralcontainers, pods/exec, and ConfigMaps in your target namespace. Then map your IAM role to a Kubernetes user: One easily-missed requirement: target pods must have readOnlyRootFilesystem: false in their security context, or every EKS pod action will fail. Step 4: Build Your AWS Chaos Engineering Templates Save each template as JSON, then create and run it: Delete an EKS Pod Note that aws:eks:pod targets cannot be selected by ARN or tag. You must use resource parameters. FIS also offers pod-cpu-stress, pod-memory-stress, pod-io-stress, pod-network-latency, pod-network-packet-loss, and pod-network-blackhole-port for richer scenarios than deletion alone. Reboot an RDS Instance Interrupt an ElastiCache Availability Zone FIS models ElastiCache failure as AZ power interruption rather than a direct failover call. What FIS Cannot Do Being clear about the gaps saves hours of wasted searching. FIS has no native actions for ACM, KMS, Route 53, or MSK, which limits how far pure AWS chaos engineering can reach. If a tutorial hands you aws:kms:disable-key or aws:route53:change-resource-record-sets, those action IDs are invented. For MSK broker reboots, use aws:ssm:start-automation-execution to call an SSM document that invokes the MSK RebootBroker API. For certificate, key, or DNS failure testing, simulate the effect at the network layer with aws:network:disrupt-connectivity, or revoke access through IAM policy changes outside FIS. Step 5: Run, Observe, and Automate Watch pods with kubectl get pods –watch while the experiment runs. Track failovers and error rates in CloudWatch, and pull application logs from CloudWatch Logs or your EFK stack. The metrics that matter in AWS chaos engineering are mean time to detect and mean time to recover. If a pod dies and your error rate spikes for ninety seconds, that’s a readiness-probe or connection-pool problem worth fixing. Automating Your AWS Chaos Engineering Practice Use EventBridge rules to start FIS experiments on a schedule. Invoke experiments from CodePipeline as a post-deployment gate. Push results to Slack through SNS subscriptions on your CloudWatch alarms. Start with one experiment in staging, fix what it reveals, then expand. AWS chaos engineering earns its value through iteration, not through breaking everything at once. Talk to our team about building a resilience testing practice on AWS → TALK Frequently Asked Questions Does AWS FIS support Route 53, KMS, or ACM? No. FIS has native actions for ARC, CloudWatch, Direct Connect, DSQL, DynamoDB, EBS, EC2, ECS, EKS, ElastiCache, Kinesis, Lambda, MemoryDB, Network, RDS, S3, and SSM only. Any tutorial offering aws:route53:, aws:kms:, or aws:acm: action IDs is using IDs that don’t exist. Why isn’t kube-monkey killing any pods? Almost always a missing kube-monkey/identifier label, or labels applied to deployment metadata but not the pod template. Check that dry_run is false, and remember it only runs on weekdays within the configured hour window. Do I need both kube-monkey and FIS? Not necessarily. FIS covers EKS pod chaos natively through aws:eks:pod-delete and its stress actions, with stop conditions and audit trails built in. Kube-monkey is useful when you want continuous, unattended randomness rather than discrete experiments. Is stopConditions really required? Yes. create-experiment-template rejects templates without it. Use a CloudWatch alarm ARN in production. {“source”: “none”} is valid for early testing but removes your safety net. How do I run chaos experiments against MSK? Through aws:ssm:start-automation-execution pointing at an SSM document that calls the MSK RebootBroker API. There is no
DIY IoT Weather Station: Build One for Under ₦10,000
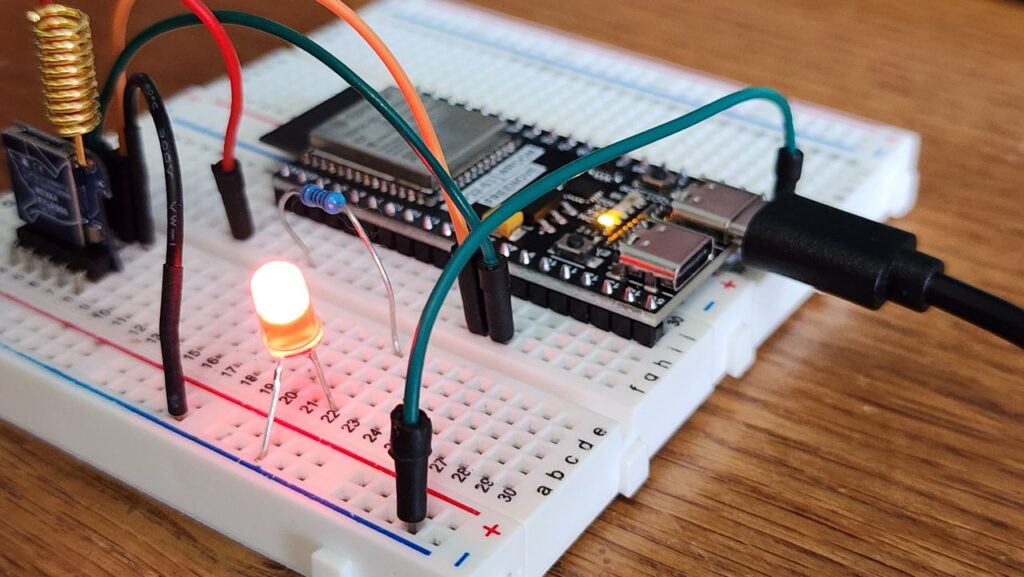
A DIY IoT weather station tells you what the sky is doing directly above your roof, not what a satellite 36,000 km up thinks is happening across your whole state. That difference matters enormously in farming, flood preparedness, and classroom science. This guide walks through building one for roughly ₦10,000, or about $7. It measures temperature, humidity, and barometric pressure, then pushes readings to a free online dashboard you can check from anywhere. Every line of code below has been compiled and tested. What Your DIY IoT Weather Station Will Do Your finished station will measure temperature, humidity, and atmospheric pressure. It will transmit those readings over Wi-Fi. And it will send them to a free cloud dashboard viewable from any browser. Along the way, you’ll pick up four transferable skills. Those are reading sensor datasheets, wiring and breadboarding, microcontroller programming, and cloud data visualisation. None of it requires prior electronics experience. DIY IoT Weather Station Parts List Everything below is available from local electronics markets or online. Item Description Est. Cost (NGN) ESP8266 NodeMCU Wi-Fi enabled microcontroller ₦3,500 DHT22 sensor Temperature and humidity ₦1,500 BMP180 or BMP280 sensor Barometric pressure ₦1,200 10kΩ resistor Pull-up for the DHT22 data line ₦100 Breadboard + jumper wires For wiring ₦1,000 Micro USB cable Power and code upload ₦500 Power bank or USB adapter Power source ₦2,000 Budget roughly ₦9,800 in total, which works out to about $7 at current rates. A weatherproof enclosure adds ₦2,000 to ₦5,000 if you plan to leave the unit outdoors. A Note on Sourcing the Pressure Sensor Bosch has discontinued the BMP180, so genuine units are getting harder to find. The BMP280 is the current equivalent and works fine here. Just note that it needs the Adafruit_BMP280 library rather than the BMP085 library used below, because its register layout is different. Prices also shift with the naira, so treat the table above as indicative rather than fixed. Step 1: Wire the Hardware Your DIY IoT weather station starts on the breadboard. Mount both sensors, then wire them as follows. For the DHT22: VCC to the NodeMCU 3V3 pin, GND to GND, and the data pin to D4. Critically, fit a 10kΩ resistor between the data pin and VCC. A bare DHT22 needs this pull-up; without it the data line floats and you’ll get NaN readings that look like a dead sensor. For the BMP180 or BMP280: VCC to 3V3, GND to GND, SDA to D2, and SCL to D1. Those are the NodeMCU’s default I2C pins, so no configuration is needed. Finally, power the board over Micro USB. Step 2: Set Up Your Coding Environment Install the Arduino IDE, then add ESP8266 board support. Open Preferences and paste this into “Additional Board Manager URLs”: Then install three libraries through Library Manager: the DHT sensor library, Adafruit BMP085/BMP180, and Adafruit Unified Sensor. You do not need to install ESP8266WiFi separately, since it ships with the board package you just added. Step 3: Create Your ThingSpeak Channel Sign up free at thingspeak.com, then create a new channel with three fields: temperature, humidity, and pressure. Copy the Write API Key from the channel’s API Keys tab, since the code needs it. Two free-tier limits are worth knowing upfront. You get four channels maximum, and you cannot post faster than once every 15 seconds. The code below uses a 20-second interval to stay safely inside that limit. Step 4: Upload the Code Replace the four placeholder strings with your own Wi-Fi credentials and API key, then flash it to the board. What the Code Does Differently Three details are worth pointing out. First, bmp.begin() is checked, so a mis-wired pressure sensor announces itself instead of silently reporting nonsense. Second, the NaN guard means a failing DHT22 never uploads junk data to your dashboard. Third, the Wi-Fi connection is re-checked before every upload, which matters for a device left running for weeks. Step 5: Deploy Your DIY IoT Weather Station Outdoors Position the station in shade. Direct sun on the DHT22 will inflate your temperature readings badly, sometimes by several degrees. Shield it from rain while keeping it open to moving air, since a sealed box measures the inside of the box rather than the weather. A simple stacked-plate radiation shield works well and costs almost nothing to improvise. For remote sites, run it from a power bank or a small solar setup. Troubleshooting Your DIY IoT Weather Station Problem Likely fix “Failed to connect to WiFi” Check SSID and password. The ESP8266 only joins 2.4GHz networks, not 5GHz. Sensor reads NaN Fit the 10kΩ pull-up on the DHT22 data line. Confirm 3.3V power and the D4 pin. “BMP180 not found” Check SDA on D2 and SCL on D1. If you bought a BMP280, switch to the BMP280 library. Dashboard stays empty Verify the Write API Key and that field numbers match your channel. Uploads work, then stop You may be posting faster than every 15 seconds. Keep the interval at 20000. Talk to our team about IoT curriculum design and rural sensor deployments → TALK Where This Data Actually Gets Used micro-climate data changes decisions. Farmers in Nasarawa or Kebbi can time irrigation against humidity and temperature trends on their own plot rather than a regional forecast. School STEM clubs get a physical, working demonstration of electronics, networking, and data analysis in one build. And communities in flood-prone areas can watch barometric pressure, since a sharp drop often precedes heavy rainfall. Joining the Wider Network Africa already has a serious community weather network. The Trans-African Hydro-Meteorological Observatory runs more than 700 stations across 24 countries, including Nigeria, Kenya, and South Africa, with most hosted at local schools and over three billion data points collected. It’s now the largest source of in-situ African weather data for governments and researchers. That context reframes this project. You aren’t starting from zero. Instead, your DIY IoT weather station adds density to a network that already exists. Hyperlocal readings from hundreds of small stations capture
AI Replacing Software Engineers? What the Data Says

The question of AI replacing software engineers has moved from speculation to boardroom budgeting. Tools like GitHub Copilot and ChatGPT now auto complete code, suggest fixes, and generate whole functions from plain-English prompts. The honest answer is more interesting than either side of the hype. AI is not making engineers obsolete. It is, however, reshaping who gets hired and what the job actually involves. The data on that shift is sharper than most commentary admits. Every Automation Wave Sparked This Same Fear Worries about AI replacing software engineers echo a much older pattern. Software engineering has moved through automation waves for sixty years. Developers punched cards in assembly in the 1960s. High-level languages like C and Java, plus GUI tooling, freed them from low-level details by the 1980s. Compilers, frameworks, RAD tools, and low-code platforms each automated boilerplate long before generative AI arrived. Every one of those leaps triggered the same prediction, and none of them eliminated the profession. Instead, each abstraction shifted what engineers spent their time on. Large language models are simply the newest step on that continuum. They take English instructions and produce code, handling well-known patterns efficiently. Building genuinely novel systems, though, still demands human creativity and judgement. That’s the pattern worth holding onto when people talk about AI replacing software engineers today. What AI Coding Tools Actually Do Well Adoption has been fast and enormous. GitHub Copilot reached roughly 4.7 million paid subscribers by January 2026, growing 75% year over year. It now has around 20 million total users and is deployed across roughly 90% of Fortune 100 companies. The productivity gains are real, too. Among developers who use agents at work, 69% report a measurable increase in productivity. Roughly 70% say agents cut the time spent on specific development tasks. Copilot performs best on repetitive work, offloading boilerplate so engineers stay in flow. Many developers also report higher job satisfaction, since more of their day is spent on interesting problems. The Trust Gap Developers Rarely Mention Here’s where the picture complicates. Stack Overflow’s 2025 Developer Survey found AI adoption at 84%, yet trust in AI output fell to 29%. That’s down eleven points from the previous year. More developers actively distrust AI accuracy (46%) than trust it (33%). Only 3% say they highly trust what these tools produce. The frustrations are specific rather than vague. Two-thirds of developers, 66%, cite AI solutions that are “almost right, but not quite” as their single biggest problem. That leads directly to the second complaint. Some 45% say debugging AI-generated code takes longer than writing it themselves would have. LLMs hallucinate plausible-but-wrong solutions, skip edge cases, and occasionally introduce security flaws. Someone experienced has to catch all of that, which is the first practical argument against AI replacing software engineers outright. Is AI Replacing Software Engineers? What Hiring Data Shows This is where honesty matters more than reassurance. The evidence does not support a simple “AI creates more developer jobs” narrative. It doesn’t support “AI is ending the profession” either. Instead, it shows something more specific: a squeeze concentrated at the entry level. The Junior Squeeze Is Real A Harvard study of 62 million workers found that when companies adopt generative AI, junior developer employment drops roughly 9-10% within six quarters. Senior employment barely moves. Industry figures point the same direction. Junior developer hiring is down about 35% from 2023 levels. Entry-level generalist engineering roles have fallen roughly 25% from their 2023 peak, and coding bootcamp enrolment has dropped about 40%. Certain categories absorbed the hit hardest. Boilerplate backend work, CRUD APIs, admin tooling, and basic data transformation are increasingly AI-assisted. QA and test automation has been affected faster than any other engineering subcategory. Some teams that once ran three to five QA engineers now operate with one person overseeing AI-generated coverage. Where Demand Is Growing Instead The other half of the story rarely makes headlines. AI engineer roles have grown roughly 300% since 2023. Meanwhile, AI/ML engineering faces a 63% talent shortage against 500,000-plus open roles globally. Engineers moving fastest into new positions are those who added LLM integration, MLOps, cloud infrastructure, or security engineering to their skills. Employers have also shifted what they screen for. Problem-solving ability, AI literacy, and code-review capability now matter as much as raw coding speed. After all, someone has to catch what the model got wrong. So the real story isn’t AI replacing software engineers. It’s the profession’s entry ramp getting steeper while its senior tier gets more valuable. The Investment Backdrop Behind All This The scale of money involved explains the urgency. Alphabet, Amazon, Meta, and Microsoft are collectively on track for roughly $725 billion in capital expenditure during 2026. That’s up around 77% from the previous year. Amazon alone projects about $200 billion, while Microsoft is tracking toward roughly $190 billion. Alphabet has guided to between $175 and $185 billion, and Meta to between $115 and $135 billion. Most of that money goes to AI infrastructure: GPU clusters, custom silicon, and data centers. Tools built on that infrastructure are landing in developer workflows whether individual teams sought them out or not. Nigeria’s Position in the AI Shift Nigeria has moved faster than many observers expected. The National Centre for Artificial Intelligence and Robotics was established under NITDA in November 2020, and is described as Africa’s first government AI centre. It coordinates AI research and policy across federal institutions. It also runs alongside the Nigeria Artificial Intelligence Research Scheme and an AI Fund launched with Google to back local startups. Building Models for Local Context NiGPT, Nigeria’s first multilingual large language model, was developed by NITDA and NCAIR. Lagos startup Awarri and global partner DataDotOrg built it alongside them. Backed by $3.5 million and over 7,000 fellows from the 3MTT program, it handles Yoruba, Hausa, Igbo, Pidgin, and Ibibio, plus accented English. That matters because models trained mostly on Western data handle the Nigerian context poorly. Nigerian Startups Building With AI Two Nigerian startups illustrate the shift. Vzy, founded
Digital Identity in Africa: The Race to Reach 470 Million

Digital identity in Africa is quietly becoming one of the continent’s most consequential technology stories. A digital identity is more than a login. It’s the key to healthcare enrolment, a bank account, a SIM card, and, in many countries, the right to vote. Roughly 470 million people across Sub-Saharan Africa still have no official proof of who they are. That single gap explains why digital identity in Africa has become both an urgent challenge and a rare opportunity. This piece breaks down what digital identity actually means. It also covers why Nigeria’s rollout matters so much, and what a system built for people, not just governments, would need to look like. What Is Digital Identity, Really? Digital identity is the electronic version of a person’s real-world identity. It typically includes a unique identifier, such as a number or username. It also includes verified attributes like a name, date of birth, or biometric data, plus credentials stored on a platform, centralised or decentralised. And it includes the digital trail a person leaves across apps and services. Done well, digital identity helps governments serve citizens more efficiently. It also helps individuals reach services that would otherwise stay out of reach. Done poorly, though, it becomes a surveillance tool, or worse, a mechanism of exclusion. That tension, between empowerment and control, is exactly what makes digital identity in Africa such high-stakes territory right now. Digital Identity in Africa: The Size of the Gap Africa presents a genuine paradox. Mobile phone use is booming. GSMA projects roughly 623 million unique mobile subscribers across Sub-Saharan Africa by 2025, close to half the region’s population. Meanwhile, an estimated 470 million people across that same region still lack any form of official identification. That gap carries real consequences. Without an ID, people are routinely excluded from health insurance enrolment. Opening a bank account or building a credit history becomes nearly impossible without one. And without an ID, registering to vote and taking part in democratic processes is often out of reach entirely. Because of that gap, several governments are racing to close it. Ghana has its Ghana Card. Kenya has Maisha Namba. Nigeria has the National Identification Number, or NIN. Each approach carries its own tradeoffs. None of them has fully solved the problem yet. Three National Models Worth Watching Ghana’s Ghana Card Ghana’s National Identification Authority has issued the Ghana Card to more than 19 million citizens as of 2026. Roughly 217,000 registered non-citizens hold one too. The card doubles as a tax identification number. It’s now required to open a bank account or apply for a passport, which has pushed adoption well beyond the slower early registration years. Kenya’s Shift to Maisha Namba Kenya’s earlier Huduma Namba program ran into legal and public trust problems. It was ultimately discontinued. Kenya replaced it in 2023 with Maisha Namba, a lifelong personal identification number tied to a redesigned legal and data-protection framework. As of 2026, roughly 13 million Kenyans hold the new Maisha Card, with 20,000 to 30,000 more issued daily. Spotlight on Nigeria: The NIN Push Nigeria’s National Identity Management Commission, or NIMC, runs the country’s flagship digital identity program: the National Identification Number, or NIN. It’s now mandatory for SIM registration, banking, and a growing list of government services. Nigeria’s scale makes it the clearest test case for digital identity in Africa at a national level. The Numbers Behind Nigeria’s NIN More than 136 million Nigerians and legal residents had enrolled in the NIN database as of early 2026. That’s a sharp rise from just over 100 million in 2024. NIMC is also working to integrate the NIN with the Bank Verification Number and SIM registries. The goal is one interoperable identity layer across the country. The World Bank-linked target now calls for 180 million enrolments by December 2026. That means NIMC needs roughly 3.3 million new registrations every month to hit it. Where Nigeria’s Digital ID Push Is Struggling Large rural populations remain unregistered, mainly because biometric devices and registration centers are still scarce outside major cities. Trust is also a real obstacle. Many citizens worry openly about surveillance, data misuse, and the risk of cyberattacks against a database holding so much sensitive information. Nigeria did strengthen its legal foundation with the Data Protection Act of 2023. That law created the Nigeria Data Protection Commission and replaced the older, weaker regulation it operated under. Even so, enforcement and public awareness of these new protections are still catching up to the law itself. The Double-Edged Sword of Biometric ID Biometric systems, including fingerprints, facial scans, and iris data, sit at the centre of most digital identity programs in Africa. The upside is real. Biometrics reduce fraud. They let one credential link multiple services together, and they work reasonably well even in low-literacy environments where written passwords don’t. The downside is just as real, though. A fingerprint isn’t easily revocable the way a compromised password is. Biometric databases create a tempting target for mass surveillance or misuse, especially where strong legal safeguards haven’t caught up to the technology. That tradeoff sits at the centre of digital identity in Africa today. Who owns this data? Who can access it? What stops digital identity in Africa from tipping into digital oppression rather than opportunity? A Cautionary Case: Biometric IDs for Refugees Kenya offers a documented example of how these risks play out in practice. UNHCR funded and trained Kenya’s Department of Refugee Affairs, which has gradually taken over refugee registration since 2011. The resulting biometric system was specifically designed to crossmatch entries between humanitarian and national security databases. That gave government security agencies a path into data refugees had provided for aid purposes alone. That’s not an isolated design choice, either. A UNHCR internal audit found that refugees in four of five countries reviewed weren’t given adequate information about how their biometric data would be used or shared. The starkest global example of what can go wrong remains the Rohingya case, where UNHCR faced accusations of sharing
Datadog to BigQuery: Exporting APM Logs

Datadog is built for real-time diagnosis. BigQuery, meanwhile, is built for large-scale analytical querying, long retention, and joining telemetry against data that lives outside your observability platform. Moving a filtered subset of APM logs from Datadog to BigQuery is a reasonable thing to want. The path itself is short: a forwarder, a buffer, and a managed sink. This guide covers that path, with the failure modes that are easy to hit and hard to diagnose called out where they occur. Architecture for Moving Datadog to BigQuery Logs are collected by Datadog agents and processed by an ingest-time pipeline. A log forwarding destination then pushes matching logs to an HTTP endpoint. From there, a Cloud Run function receives the payload, projects each log onto the target schema, and publishes to Pub/Sub. A Pub/Sub subscription with a BigQuery delivery type streams those messages into the table, and a dead-letter topic catches anything BigQuery rejects. The design decision worth explaining is where schema conformance happens. It belongs in the forwarder, not in Datadog. Datadog’s processors are good at parsing and enrichment but awkward at producing an exact field set, and you cannot unit-test a Datadog pipeline. Doing the projection in Python means the mapping is version-controlled, testable, and fixable without touching the observability config. Step 1: Capture a Real Payload First, before building anything, get an actual log off the wire. Confirm in APM > Traces that the services you care about are producing spans, then filter Log Explorer to the logs you intend to export, for example source:apm @dd.trace_id:*. One caution about the JSON tab in Log Explorer: what it renders is the Logs API representation, which wraps fields in a content object. That envelope is not what pipeline processors operate on, and it is not necessarily what arrives at your HTTP destination either. Treat it as a guide to which fields exist, not as the shape of the payload. Instead, the authoritative sample is the one your endpoint actually receives. Deploy the function from Step 3 with a temporary handler that logs the raw body, send a small volume through, and build the mapping against that. Step 2: Parse and Enrich in Datadog Create a pipeline under Logs > Configuration > Pipelines with a filter matching only the logs you intend to export. This is also the point where most Datadog to BigQuery mapping problems get introduced, so test the filter in Log Explorer before saving. Grok Parsing Datadog’s Grok implementation uses the syntax %{MATCHER:EXTRACT:FILTER} with its own matcher names. These are not the Logstash or Elastic names. Datadog uses lowercase identifiers such as notSpace, word, integer, number, ipv4, data, date(“pattern”) and regex(“pattern”). Patterns written with IPORHOST, NOTSPACE, HTTPDATE, WORD or INT will not resolve. For a standard combined access log in the message field: access_log %{ipv4:network.client.ip} %{notSpace:http.ident} %{notSpace:http.auth} \[%{date(“dd/MMM/yyyy:HH:mm:ss Z”):http.request_time}\] “%{word:http.method} %{notSpace:http.url_details.path}(?: HTTP/%{number:http.version})?” %{integer:http.status_code} Two things to note. The matcher integer produces an actual integer rather than a string. That matters because a string arriving at an INTEGER column in BigQuery is rejected, and the row goes to the dead-letter topic. That failure presents as a delivery problem rather than a parsing problem, which is why it costs people an afternoon. The date matcher outputs epoch milliseconds. If you feed that into a TIMESTAMP column expecting RFC 3339, it will either fail or land at some point in 1970. Step 3 handles the conversion explicitly. Attribute names here follow Datadog’s standard naming, so that its own facets and dashboards work. The forwarder, meanwhile, flattens them to the BigQuery column names. Test With the Sample Use the pipeline editor’s preview with the payload from Step 1 and confirm each field extracts. Adjust for your log variations before moving on. A Note on Field Whitelisting Some guides suggest a processor that keeps only a named set of attributes, as a way of making the outgoing JSON match the BigQuery schema exactly. I could not find such a processor in Datadog’s processor list. If your account has one, it is a reasonable belt-and-braces addition. If not, do not go looking: the projection in Step 3 does this job better, because it is explicit and testable. Step 3: The Forwarder This function terminates the HTTP request, authenticates it, projects each log onto the target schema, and publishes to Pub/Sub. Authentication and a Contradiction to Avoid Cloud Run functions offer a “require authentication” setting. It requires the caller to present a Google-signed identity token. Datadog’s log forwarding can send arbitrary custom headers but cannot mint Google identity tokens, so a function with that setting enabled will reject every Datadog request before your code runs. Two workable options: Pick one deliberately. Otherwise, the failure mode of picking neither is silent 403s at the Google edge that never reach your logs. main.py requirements.txt functions-framework google-cloud-pubsub Deployment Notes Runtime: Python 3.11 or newer, entry point handle_log_request, 2nd gen. Give it a dedicated service account with roles/pubsub.publisher scoped to the topic and nothing else. Environment variables: PUBSUB_TOPIC_ID set to your topic ID, and DATADOG_SECRET mounted from Secret Manager rather than pasted as a plain environment variable. Do not attempt to set GCP_PROJECT, which is a reserved name. Both TOPIC_ID and DATADOG_SECRET are read with os.environ[…] rather than .get(), so a misconfigured deployment fails at startup instead of at 3 am. On Duplicates Returning 500 causes Datadog to retry, and anything already published in that batch gets published again. There is no deduplication on the streaming path into BigQuery. Two options exist here. The simpler choice is to accept it and deduplicate at read time using the Datadog log ID. A more involved alternative is tracking published IDs in Memorystore and skipping repeats, which is more machinery than most pipelines need. The read-time version: In short, query the view, not the table. Step 4: Pub/Sub and BigQuery Setup Create a topic, for example datadog-apm-logs-topic, with default settings. This is the buffer that decouples Datadog to BigQuery delivery from BigQuery’s own availability. Then the dataset and table. Schema: Three deliberate